
Install 4 AA Duracell batteries in the clock’s rear compartment, ensuring proper alignment. Select the chime type using the switch: slide left for Westminster, right for Whittington. The chime sequence at :15, :30, and :45 is preset and cannot be manually adjusted. Ensure stable placement to prevent movement issues. Replace batteries promptly to maintain accuracy and longevity.
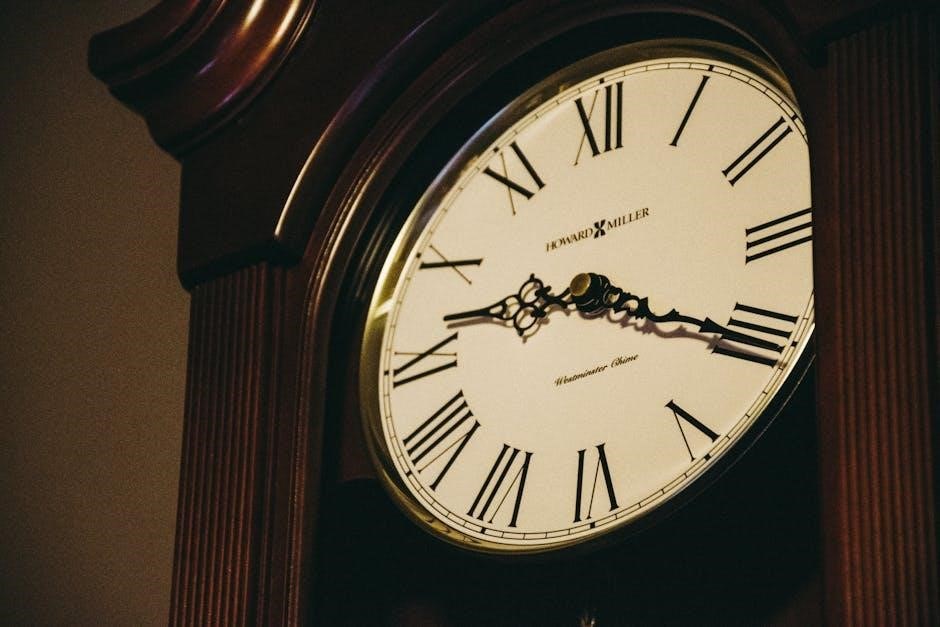
Understanding Your Quartz Westminster Chime Clock

Your quartz Westminster chime clock combines precision timekeeping with the classic Westminster chime melody. Designed for wall or mantel placement, it operates on battery power, ensuring reliability without mechanical wear. The clock features a quartz movement, which drives the gears and pendulum while playing the chime sequence at specific intervals. The Westminster chime plays on the hour, half-hour, and quarter-hour, creating a traditional and elegant atmosphere. Many models, such as Hermle, Bulova, and Howard Miller clocks, use this mechanism, offering dual chime options (Westminster or Whittington) for versatility. The chime sequence is pre-programmed and cannot be altered manually, ensuring consistent and accurate performance. By default, the clock is factory-set for optimal operation, but adjustments may be required for time zone or daylight saving changes. Proper placement and regular battery checks ensure smooth functionality and extend the clock’s lifespan.
Battery Installation and Basic Setup
Your quartz Westminster chime clock requires 4 AA-size batteries for operation. These are typically alkaline AA batteries, such as Duracell, to ensure optimal performance. Access the battery compartment located at the rear of the clock by carefully removing the battery cover. Insert the batteries following the polarity markings indicated inside the compartment. Proper alignment is crucial to ensure the clock functions correctly. After installation, replace the cover and position the clock securely on a flat surface or mount it on the wall as intended. To activate the Westminster chime, ensure the chime selector switch is set to the desired mode (Westminster or Whittington). The clock is factory-calibrated; however, you may need to adjust the time to match your local time zone. Regular battery checks are essential to prevent downtime and maintain accurate timekeeping. Always use high-quality batteries to enhance longevity and reliability.
Chime Selection and Configuration
Your quartz Westminster chime clock offers two chime options: traditional Westminster and Whittington. Use the chime selector switch to choose between them. Slide the switch to the left for the Westminster chime, known for its full melody on the hour, half, and quarter hours. Slide it to the right for the Whittington chime, which plays a shortened version on the hour and half-hour only. The chime sequence at :15, :30, and :45 marks is preset and cannot be changed manually. To ensure optimal performance, avoid moving the hands or knobs during setup. Verify the chime function by waiting for the clock to strike at the next quarter-hour mark. Proper chime selection enhances the clock’s functionality and ensures a pleasant auditory experience. Regular testing and adjustments guarantee seamless operation over time.

Time Setting and Adjustment
Your quartz Westminster chime clock allows for precise time setting. To adjust the time, locate the small hole on the clock face and insert the included tool to access the manual adjustment knob. Rotate the knob clockwise or counterclockwise to set the hour and minute hands to the correct time. For fine-tuning, grasp the knob gently and pull it outward to set the seconds. The chime sequence at :15, :30, and :45 marks remains preset and cannot be manually altered. Ensure the clock is correctly positioned to maintain accurate timekeeping. Regularly check the time and adjust if necessary to prevent drift. Proper placement and adjustment guarantee reliable performance and an accurate ticking mechanism.

Chime Sequence Programming
Your quartz Westminster chime clock features a preset chime sequence that plays at the quarter-mile, half-hour, and three-quarter-hour marks, along with the strike on the hour. The chime sequence is electronically programmed and cannot be altered manually. To customize the type of chime, use the Chime Selector Switch located at the rear of the clock: slide it left for the Westminster chime or right for the Whittington chime; Ensure the clock is placed stably to prevent any alignment issues that might affect the sequence. To test the chime sequence, allow the clock to reach the pre-set chime times naturally without manually adjusting the hands. Proper programming ensures accurate and synchronized chime playback, enhancing the clock’s functionality and charm.
Maintaining Accurate Timekeeping
Your quartz Westminster chime clock relies on its movement to maintain precise timekeeping. To ensure accuracy, replace batteries promptly when the clock begins to slow down or stop. Place the clock on a stable surface to minimize jolts or vibrations that could disrupt its rhythm. Avoid exposing it to direct sunlight or extreme temperature changes, as these can affect its internal components. If the time drifts, adjust it using the time set knob, but avoid moving the hands manually while the chime is active. Proper care ensures consistent performance and uninterrupted timekeeping. Regularly check the clock’s operation and address any issues promptly to maintain reliability and accuracy over time.
Cleaning and Dust Removal
Regularly clean your quartz Westminster chime clock to maintain its functionality and appearance. Use a soft, lint-free cloth to gently wipe the clock’s surface, avoiding harsh abrasives that could scratch the finish. For dust removal, hold the clock in place and carefully vacuum it with a soft brush attachment or use compressed air to gently blow away dust from hard-to-reach areas. Clean the chime mechanism and movement with a dry, soft cloth to prevent dust buildup, which can interfere with smooth operation. For deeper cleaning, dampen a microfiber cloth slightly and wipe the exterior, ensuring water doesn’t reach internal components. Carefully inspect and clean the clock’s interior if accessible, taking special precautions around delicate parts. Keeping the clock in a stable, dust-free environment will help prevent dust accumulation and ensure long-term performance.

Troubleshooting Common Issues
If your quartz Westminster chime clock stops working, first check the battery connections to ensure they are secure and properly aligned. If the chimes are not playing, verify that the chime selector switch is set to the desired mode (Westminster or Whittington) and that the time is set correctly. If the clock drifts, adjust the time regularly or replace the batteries to maintain accuracy. For chime volume issues, check the volume control, if available. If the chimes are out of sync, avoid manually moving the minute hand, as this disrupts the programmed sequence. If the clock movement seems sluggish, inspect for dust buildup and clean gently with a soft cloth. If the clock fails to function despite new batteries, consider replacing the movement or consulting the manual for further guidance. Regular maintenance helps prevent common issues and ensures smooth operation.
Battery Replacement and Longevity
Replacing batteries is essential to ensure your quartz Westminster chime clock functions properly. Use high-quality 4 AA Duracell batteries for optimal performance. To replace them, locate the battery compartment at the clock’s rear, carefully remove the old batteries, and insert the new ones, ensuring they are positioned correctly according to the diagram or markings on the clock. Replace batteries promptly when the clock shows signs of battery-low indicators or when the chimes become faint. For clocks with a battery compartment key, store it safely to avoid losing access. Regular battery replacements help maintain accurate timekeeping and prevent clock drift. Over time, failing batteries can damage the clock’s internal circuitry, so monitor their condition closely. For clocks with exposed battery terminals, clean the connections gently with a soft cloth to ensure proper contact. If your clock has a low-battery warning, reset it after replacing the batteries by adjusting the hands slightly or referring to the manual. Keeping batteries fresh extends the clock’s lifespan and ensures consistent performance. Always store spare batteries in a cool, dry place to preserve their charge longevity. Promptly address any issues with battery installation to prevent operational delays or complete clock shutdowns.
Adjusting the Chime Volume
Your quartz Westminster chime clock is equipped with a volume control feature to customize the loudness of the chimes. Locate the volume control dial or knob, typically found on the back or side of the clock. Gently turn the dial clockwise to increase the volume or counterclockwise to decrease it. Be cautious not to apply excessive force, as this could damage the mechanism. The volume adjustment affects all chime sequences, including the quarter-hour and hour chimes. If the chime volume appears uneven or distorted, ensure the clock is placed in a stable, well-ventilated area to prevent interference with sound quality. For clocks with electronic volume controls, consult the manual for specific instructions on adjusting the settings. Avoid placing the clock in overly quiet environments where the chimes may seem excessively loud. If the volume control does not respond or the chimes remain too soft, inspect the battery connections or contact customer support for further assistance. Properly adjusting the volume ensures a pleasant chime experience without disrupting daily activities.

Using the Chime Selector Switch
To customize the chime type on your quartz Westminster chime clock, locate the Chime Selector Switch typically found on the back or side of the clock. Slide the switch to the left to select the Westminster chime, or to the right for the Whittington chime. This feature allows you to choose between the traditional Westminster melody or a different chime pattern, depending on your preference. Ensure the switch is fully aligned in the desired position to prevent unintended chime sequences. If the switch appears recessed or difficult to access, consider using a flathead screwdriver for precise movement. Be cautious not to apply excessive force, as this could damage the mechanism. The chime selector switch controls the overall chime style, allowing you to enjoy the clock’s musical tones at the :15, :30, and :45 marks, as well as on the hour. Properly adjusting the switch ensures consistent and accurate chime playback. If you encounter difficulty or the switch does not respond, inspect the clock’s placement for stability and alignment. A well-positioned clock prevents unintended movements that might affect the switch’s functionality. By mastering the use of the Chime Selector Switch, you can enhance the clock’s functionality and enjoy its melodious chimes in harmony with your surroundings.
How to Test the Chime Sequence
To test the Westminster chime sequence, wait until the next quarter hour (15, 30, 45 minutes, or on the hour). The chime sequence is electronically programmed and cannot be manually triggered by moving the clock hands or adjusting the time. At the designated mark, the clock will play the corresponding portion of the Westminster melody. For example, at 15 minutes past the hour, it plays the first portion, and at the hour, it plays the full melody. Observe the clock’s visual indicators, such as a swinging pendulum or lighted hands, to confirm the chime is synchronized with the time. If the chime does not play as expected, double-check the Chime Selector Switch to ensure it is set to the desired mode. Allow the clock to run for a full hour to hear the complete chime sequence. If issues persist, consult the user manual or contact customer support for assistance. Testing the chime sequence ensures the clock operates correctly and maintains its musical functionality.
Movement and Gear Maintenance
Regularly inspect your quartz Westminster chime clock to ensure smooth movement and proper functioning of its internal gears. Check for dust or debris that may interfere with the mechanism. Use a soft, dry cloth to gently clean the gears and movement unit, avoiding excessive force that could damage delicate components. Inspect the bearings and lubrication points for wear or dryness. Apply a small amount of clock-specific oil to keep the gears running smoothly. Be cautious not to overtighten screws or force any parts during maintenance. Ensure the quartz chime movement is secure and properly aligned to prevent misalignments. If the clock has a pendulum, verify it swings freely and adjust the suspension spring if necessary. Test the timekeeping accuracy periodically and adjust the timing if the clock drifts. Follow the manufacturer’s guidelines for servicing to maintain optimal performance. If you notice unusual noises or irregular chime sequences, address the issue promptly to avoid long-term damage. Proper maintenance ensures your clock remains reliable and enjoys a longer lifespan.
Preventing Clock Drift
To prevent your quartz Westminster chime clock from drifting, ensure it is always set to the correct time and regularly check for accuracy. Avoid placing the clock in areas with significant temperature or humidity fluctuations, as these can affect its precision. For manual adjustments, gently turn the hands clockwise to reset the time, ensuring the hour and minute hands align correctly. If the clock includes an auto-loud feature, activate it to maintain consistent timekeeping. Keep the clock stable and avoid vibrations, as they can disrupt the internal mechanisms. Replace batteries promptly when low to prevent timekeeping errors. If the clock is equipped with a drift-correction feature, follow the manufacturer’s instructions to enable it. Regularly compare the clock’s time with a reliable source and adjust as needed. Proper placement and routine maintenance help ensure your quartz clock remains accurate and reliable.

Upgrading Your Clock Movement
Upgrading your quartz Westminster chime clock movement can enhance its performance and longevity. Start by identifying a compatible replacement movement, such as the Hermle 2114-N, which is ideal for clocks requiring Westminster chimes. Ensure the new movement supports the same chime sequence and battery size as your current model. To upgrade, carefully remove the old movement and install the new one, aligning all gears and connections accurately. Double-check the chime settings and timekeeping functionality after installation. If unsure, consult the manufacturer’s instructions or a professional. Upgrading ensures your clock operates smoothly and reliably for years to come.
Chime Sequence troubleshoot

If your quartz Westminster chime clock is not playing the correct chime sequence or timing, check the following: Ensure the chime selector switch is properly aligned to the desired Westminster or Whittington setting. Verify that the clock is receiving power—dead or low batteries can disrupt the chime sequence. Inspect the movement connections and gears for proper alignment. If issues persist, refer to the manufacturer’s manual, such as the Hermle 2114 or Howard Miller instructions, for additional troubleshooting steps. Contact the manufacturer directly or visit their website for detailed guidance on resolving specific chime sequence problems.
Adjusting the Chime Timing
To adjust the chime timing on your quartz Westminster chime clock, ensure the clock is correctly positioned and firmly secured to prevent unwanted movement. Insert fresh batteries as dead or low batteries can affect timing accuracy. Locate the chime selector switch and ensure it is set to the desired chime mode (Westminster or Whittington). If the chime timing is off, use the minute hand to align the clock’s time with the correct hour. Some models allow for fine-tuning the chime sequence through adjustment knobs located at the rear of the clock. Refer to the manufacturer’s manual, such as the Hermle 2114 or Howard Miller instructions, for specific guidance. Avoid excessive manipulation of the clock’s gears, as this may disrupt internal mechanisms. If the timing remains inconsistent, consult the manufacturer or a professional for assistance.
Identifying and Replacing Faulty Components
To identify faulty components in your quartz Westminster chime clock, begin by inspecting the clock’s exterior for visible signs of damage, such as cracks or loosened parts. Check the battery compartment for corrosion or worn-out batteries, which can interfere with functionality. Inspect the gears and axles for wear or misalignment, as these can cause irregular movement or chime malfunctions. If the chime sequence skips or sounds distorted, examine the chime mechanism for dirt or debris. Additionally, ensure all electrical connections are secure, as loose wiring can disrupt the clock’s functionality. If you suspect a faulty part, consult the manufacturer’s manual, such as those for Hermle or Howard Miller clocks, for guidance on replacements. Use the correct tools and take care not to force any adjustments, as this may cause further damage. Replace any worn or damaged components with genuine manufacturer-approved parts to maintain optimal performance. If repairs are complex, consider seeking professional assistance to avoid further complications.
Ensuring Proper Placement and Stability
Proper placement and stability are crucial for the optimal functioning of your quartz Westminster chime clock. Begin by selecting a sturdy, level surface to prevent wobbling or accidental movement. Avoid areas prone to vibrations or knocking, as this can disrupt the clock’s mechanism. Ensure there is sufficient space around the clock for air circulation and ease of access if adjustments are needed. For wall clocks, choose a secure mounting location to prevent swaying or tipping. Check that the clock is horizontally aligned to maintain accurate timekeeping. If placed on a mantel or shelf, use anchors or brackets to secure it firmly. Additionally, avoid exposing the clock to direct sunlight or high humidity, as these can damage the internal components over time. Periodically inspect the clock’s placement to ensure it remains stable and in optimal condition. By following these steps, you can ensure your clock operates reliably and maintains its appearance for years to come.